Deploying Laravel Application to Digital Ocean Droplet
Published on Jan 2, 2025
Deploying a Laravel application can seem daunting, especially if you're new to server management. Fortunately, DigitalOcean simplifies this process with its Marketplace images, which comes pre-configured with all the necessary components to get your application up and running swiftly. In this comprehensive guide, we'll walk you through each step to deploy your Laravel application to a DigitalOcean Droplet using the Laravel image from the Marketplace.
Prerequisites
Before we begin, ensure you have the following:
- DigitalOcean Account: Sign up at DigitalOcean if you haven't already (you may signup through this link and get $200 credit).
- Laravel Application: A Laravel project ready to be deployed. This could be hosted on a platform like GitHub.
- Domain Name: (Optional) A domain name if you wish to point it to your Droplet.
- SSH Key: It's recommended to use SSH keys for secure access. If you don't have one, you can generate it during the Droplet creation process.
Step 1: Create Droplet
Navigate to Droplets:
- Once logged in, click on the "Create" button in the top right corner.
- Select "Droplets" from the dropdown menu.
Choose Region and Datacenter:
- Select a region closest to your target audience to reduce latency.
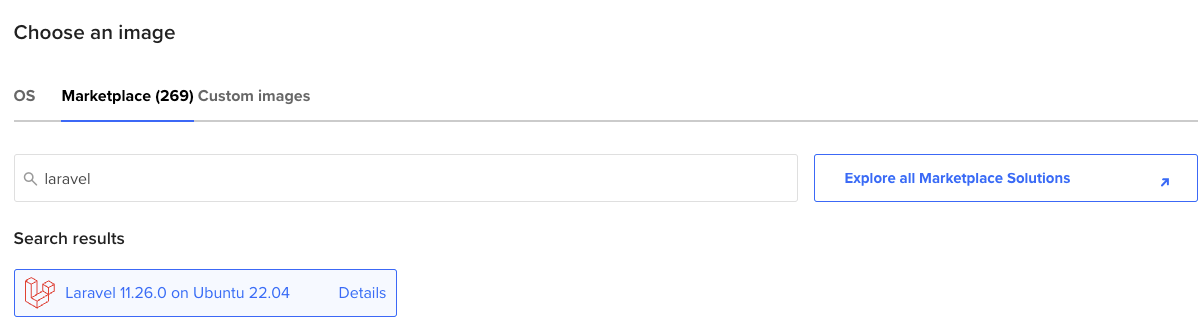
Choose an Image:
- In the "Choose an image" section, click on the "Marketplace" tab.
- Search for "Laravel".
- Select the "Laravel" image (this image created by DevDojo).
Select a Plan:
- Choose a plan that fits your application's requirements. For small to medium applications, the Basic plan with 1GB RAM is often sufficient.
- You can scale up later if needed.
Authentication:
- SSH Keys: It's recommended to use SSH keys for authentication. If you don't have one, you can generate it via ssh-keygen command.
- Password: Alternatively, you can use a password, but SSH keys are more secure.
I would also choose the following option for future monitoring

Finalize and Create:
- Set the Hostname for your Droplet.
- Click "Create Droplet" to initiate the process.
- It may take a few minutes for your Droplet to be provisioned.
Step 2: SSH into Your Droplet
Copy your droplet public IP address and open terminal on your PC and try to login to the server:
If you server IP something like this: 157.230.215.142, you may login into the server via the following command:
ssh root@157.230.215.142
Step 3: Connect Your Domain and Install SSL Certificate
You may want to follow the instructions provided by the image to install your domain if you pointed it already to digital ocean. Check this article to learn about pointing domains. The image will also create an ssl certificate for you.
If you don't have a domain yet just skip this step by clicking on ctl + c and you might do it latter by this command:
certbot --nginx -d example.com -d www.example.com
Anyway you'll find your server setting under /etc/nginx/sites-enabled you will find a new file named laravel. if you followed the typical instruction you will not need to update it.
Step 4: Create MySQL User
Log In to MySQL
Log in to MySQL with the root user just type the following:
mysql
Create New User
Use the CREATE USER command to create a new user. Replace username and password with the desired username and password:
CREATE USER 'username'@'localhost' IDENTIFIED BY 'password';
Grant Privileges
We will grant this user all privileges by the following command. Replace username with the username you provided
GRANT ALL PRIVILEGES ON *.* TO 'username'@'localhost';
Apply Changes
After granting privileges, reload the privilege tables to ensure the changes take effect:
FLUSH PRIVILEGES;
Step 5: Setup the application
You will find a laravel folder under /var/www which contains a laravel blank application you may continue on this file if you are starting from scratch.
If you have your laravel project in a github repo you need to clone it in same folder name `laravel` and remove the old setup. Or maybe in another name but you need to update project path in the server block.
After pulling you project you need to update .env file with the database credentials we just created and do the following commands
Install Packages
composer install --no-dev --optimize-autoloader
Generate App Key
php artisan key:generate
Run Migrations
php artisan migrate --seed
Grant Permissions to Assets
sudo chmod -R 777 storage
Link Storage
php artisan storage:link
Those are pretty match the things you need to do.
If you stuck on any step, You may check this video
Also I'll happy to provide support if I've availability.
You can reach out to me on Linkedin, Youtube or via email: info@dev-talks.io